December 29, 2011

Bourbon Tour

Being from Kentucky, a trip to a bourbon distillery is a must! My boyfriend just got into town, so today we decided to take a trip to two different distilleries in Kentucky. 

Woodford Reserve & Buffalo Trace Distillery

Woodford Reserve is one of the smaller bourbon distilleries located just south of Frankfort in Versailles, KY. This distillery is a very picturesque and has a ton of history! Here are some pictures from our trip with some fun bourbon facts!
The production buildings of Woodford Reserve
Bourbon Barrel "Railroad"
This fun "railroad" is how the workers transport full oak barrels full of bourbon from the "filling" building to the "aging" building. To be considered "bourbon", the liquor must be aged in newly charred oak barrels for a minimum of two years. Woodford takes great pride in their product and allows the liquor to age for six to nine years. The barrels are HEAVY! Without any liquid, the barrels themselves weight 100 pounds, and with the addition of the liquid, they weigh OVER 500 pounds! So the "railroad" is semi necessary. 
Fermentation Tank
This gigantic barrels holds 7,500 gallons of bourbon mash which consists of corn (72%), malted barley (10%), rye (18%), KY limestone water, and their secret yeast strain. As the mash ferments in these tanks, the yeast converts the sugars in the grain into alcohol.
Copper Pots Distills 
Once the mash has fermented and the yeast have done what they need to do, the alcohol needs to be separated from the mash. This is uniquely done in three separate copper pot chambers that have been imported all the way from Scotland. The mash is boiled and the alcohol evaporates out of the first, and condenses into the second copper pot. The process happens again in the third pot, resulting in a clear liquor. This clear liquor is commonly referred to as "moonshine," if left as is. 
Bourbon Before Aged
The liquor is then pumped into the oak barrels and left to age for six to nine years to get the distinctive amber color and flavor.
Charred Oak Barrels

Aging Bourbon

Bottling Process
After the bourbon has aged for the appropriate amount of time, it is then bottled, shipped, and sold at a retailer near you!

Buffalo Trace Distillery

Now it is hard to compare Woodford Reserve with Buffalo Trace, because the former produces bourbon on a small scale, the latter produces a much greater volume. Buffalo Trace produces 14 different types of bourbon at this location located in downtown Frankfort, KY. So the grounds are a little more industrial looking.

Buffalo Sculpture

Bourbon Production Buildings
We didn't get to see exactly where the bourbon is produced here, because everything is so spread out. But the process of producing the bourbon is essentially the same as Woodford Reserve, except for a few different minor adjustments. (For more specific information about their product, click here!)
Bourbon Barrel

Experimental Barrels
One of the most interesting things about Buffalo Trace were their "experimental barrels" of bourbon. These barrels were much smaller than their usual batch, and used grains such as rice and oats instead of the usual corn, barley, rye combo. Once the barrels have aged enough, they will compare that product to their current product and possibly make a brand new bourbon form it. Exciting! 
Our Tour Guide with all Buffalo Trace Bourbon Products

And we tasted of course! We tasted two different types of bourbon and a "Bourbon Cream" which is basically like Baileys Irish Cream, except with Bourbon! (That was my favorite)
Marshall with Bourbon

Me with Bourbon Cream

I highly recommend visiting some bourbon distilleries if you are ever in the Louisville/Lexington Kentucky area!

For more information about the Kentucky Bourbon Trail, click here!

December 27, 2011

Not Vegetarian Friendly

I hope everyone had a wonderful holiday! Now, I know I have only really blogged about desserts and sweet items, so I decided it was time to switch things up a bit.... with MEAT!
Now I know what you're thinking... a Nutrition student? and red meat? Don't get me wrong, I am a firm believer in incorporating more vegetarian and plant based meals into one's diet as part of a healthy lifestyle. I myself experiment with vegan and vegetarian options now and again, but sometimes, a girl just needs a big slab of meat! So that's just was a had for Christmas Eve Dinner!

The big piece of meat pictured above is actually a portion of Buffalo (aka: Bison) Tenderloin. Personally, I prefer to have Bison over Beef any day, for a number of reasons, one being it is a leaner cut of meat. So I also feel that this is a good opportunity to go through of a few differences between beef and bison.

1. I will start with the obvious:
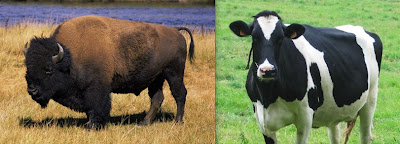
Bison                                                                Beef

 Glad we cleared that up!

2. Unlike most cows raised for consumption, bison usually spend their whole life roaming freely in grass and feed on mostly grass and hay.

3. To find beef that has been grass fed similar to bison is usually a challenge in most grocery stores, unless you go to a more specialty grocer, such as Whole Foods. Even then, grass fed beef is almost always more expensive.

4. If you are worried about there being antibiotics and growth hormone residues being in your food supply, then there is nothing to worry about with bison! Bison are not given these icky chemicals while they are raised.

5. The nutrition profile of bison is also better than beef. Because bison are able to graze and roam freely, their meat is very lean and tender, especially the tenderloin portion. Therefore, there is less saturated fat in one ounce of bison, compared to one ounce of beef, which is great news for your arteries!

Overall, bison is similar in flavor and tenderness to that of beef, but with less fat! For more information on bison, check out this link!

So if you're ever in the mood for some red meat, I hope you will give bison a chance! Below is the "recipe" for my favorite way to cook bison! Hope you enjoy!

Print this recipe!

Pan Seared Bison


Ingredients

  • 2, 6-oz. bison tenderloin filets, about 2'' thick
  • 1/2 teaspoon salt
  • 1/2 teaspoon pepper
  • 1 teaspoon dried rosemary
  • 1/2 tablespoon olive oil
  • 1/2 tablespoon butter
Probe Thermometer (optional)

Directions

Rinse and pat dry your bison steaks. Evenly season bison with salt, pepper, and rosemary.
If using a probe thermometer, insert the probe into the thickest portion of the meat, ensuring the probe is centered in the middle of the steak.
In a sauté pan over medium-high heat, add the butter and oil. Allow the butter to melt and for the mixture to get very hot and slightly browned.
Add the steaks to the hot pan, and brown on all sides.

Once brown, transfer steaks to an oven-safe pan and bake at 350 degrees F for about 15 - 20 minutes for medium.

 If using a probe thermometer, cook until internal temperature reaches 135 - 140 degrees F (medium rare - medium).

Remove filets from oven and let rest on counter for 5 minutes before serving.
Note: the butter/ oil pan is a great starting place for making a wine sauce for the bison, after it is browned! Reduce your favorite red wine down in the pan with either arrowroot or flour as a thickener. Finish sauce with butter and serve with bison!


December 24, 2011

Christmas Cookies: Part 2

Happy Christmas Eve!

I told you all I would NOT forget to tell you about those delicious double chocolate cookies I pictured yesterday!
And they are one BIG cookie! I adapted a double chocolate chip cookie recipe I found online, because I wanted the cookie to have more of a wintery holiday feel. With the addition of my "secret" ingredient, they came out really well with just a hit of peppermint!

What was my "secret" ingredient you ask? Candy Cane Joe Joe's!!
Now, Trader Joe's is one of my favorite grocery stores to visit, mainly because I always end up finding a product that looks delicious and is never on my actual grocery list. And that is how the candy cane Joe Joe's ended up in these cookies! Hope you enjoy!

Print this recipe!

Double Chocolate Chip Peppermint Cookies


Adapted from Annie's Eats


Ingredients

  • 1 cup (2 sticks) cold, unsalted butter
  • 1 1/4 cups sugar
  • 2 large eggs
  • 1/2 cup dark cocoa powder, sifted
  • 2 1/4 cups All Purpose Flour
  • 1/4 teaspoon salt
  • 1 teaspoon baking powder
  • 1/4 cup semi-sweet or dark chocolate chips
  • 12 Candy Cane Joe Joe's, crushed
Directions
  1. Preheat oven to 350 degrees.
  2. In a stand or electric mixer, combine the butter and sugar, and beat together until light and fluffy.
  3. Add in the eggs to the butter mixture one at a time, making sure each one is fully incorporated before adding the next.
  4. Add the cocoa powder into the mixture until throughly mixed together.
  5. Sift the rest of the dry ingredients together and add dry to the wet ingredients. Mix until just combined.
  6. With a spatula, stir in the chocolate chips and peppermint cookies until evenly combined.
  7. Roll the dough into rounded tablespoons and place on a parchment lined baking sheet. Flatten the tops of the dough balls slightly so they are flat on top. Visual:
Bake cookies for 12 - 15 minutes, being sure not to over-bake. Cool on a wire cooling rack and enjoy!

Yield: About 28 cookies

December 23, 2011

Christmas Cookies: Part 1

What a day! Not only have I baked off over 125 cookies today, I finished my Christmas shopping, and gathered all the groceries for our Christmas Eve Meal! Getting up early to beat the crowds to the mall and the grocery store was definitely the way to go!

But anyway, on to more important things.... cookies!!!!!

Don't they look yummy! These cookies have been my all time favorite sugar cookie recipe EVER! The recipe comes from a family friend, Maggie! Maggie and her husband, Bob, used to live right across the street from us when I was little, and she frequently took care of me. I remember helping her make these cookies as a little girl, and to this day I make a point to make a batch every December. They are SO fun to make and so vibrant with the colored sprinkles on top!

I just also recently learned that the sugar cookie recipe has been around for many years in Maggie's family. It actually came from Maggie's mother's Hungarian next door neighbor! Needless to say, I am very grateful the next door neighbor shared her recipe, because the cookies are absolutely delicious!


Print this recipe!

Maggie's Sugar Cookie Recipe


Ingredients

  • 1 cup powdered sugar
  • 1 cup granulated sugar
  • 1 cup butter/ margarine, softened
  • 1 cup canola oil
  • 2 large eggs
  • 1 teaspoon vanilla extract
  • 1 teaspoon salt
  • 1 teaspoon baking soda
  • 1 teaspoon cream of tarter
  • 4 1/4 cups all purpose flour
  • Colored sugar 
Directions
  1. Cream the butter and sugars together in a stand mixer on medium speed until light, fluffy, and smooth.
  2. Add the oil, eggs, and vanilla and mix until smooth.
  3. In a separate bowl, sift all of the dry ingredients together.
  4. Add the dry ingredients to the butter-sugar mixture and mix by hand with a wooden spoon.
  5. If the dough is too wet, refrigerate dough until it is a little stiffer and will roll easily into balls.
  6. Take about 1 tablespoon worth of the dough and roll into a ball. Place on an un-greased cookie sheet about 1 inch apart.
  7. Press colored sugar into dough (explanation below).
  8. Bake cookies at 375 degrees for 6 - 8 minutes. Cookies will have barely any brown color.
Yield: 4 dozen cookies

Now the fun part... adding the sprinkles!

For this, you will need a flat bottomed glass and a bowl for your colored sugar. I usually have a set up that looks like this:


I like to use a separate glass for every sprinkle color. So, by now you should have rolled out your little dough balls and placed them on the cookie sheet. Pour your colored sugar out into two small bowls wide enough so that your glasses can rest in them. 

Before you use your glasses, press the bottom of the glasses into the prepared cookie dough, so they are a little sticky/ tacky on the bottom. That way, when you put your glass in the sugar bowl, the sprinkles will stick to it!

With your sugar stuck to the bottom of the glass, next flatten your little round dough balls into flat disks. The sugar will now be sticking to the top of the cookie! For visual learning:


Repeat the process until all your cookies are pressed out. Then you are ready to bake! They are super fast and only take about 7 minutes in the oven!
Delicious! And don't worry, I'll tell you all what those yummy chocolate cookies are too!

Happy Holidays!

December 22, 2011

Baking Tips - Cleaning Edition

If you are like me, then holiday time means one thing: Baking TONS of Christmas Cookies! But with baking tons of cookies usually comes... TONS OF CLEANING!! And I really dislike cleaning the whole kitchen after spending all of my energy baking. So I have devised a few quick and easy ways to minimize cleaning, while maximizing your cookie output production.

Tip #1: Set aside an ingredient area

I like to pick a spot in my kitchen (preferably near the sink) where I can measure out all of my ingredients. Then I put a very large piece of parchment paper down onto the surface (as seen below). In this area I like to put all of my dry ingredients that have the highest potential of getting stuck to every possible surface. Ex: flour, cocoa powder, sugar, powdered sugar, etc. That way, when you scoop out a few cups of flour for one recipe, and will need it again later, all of the flour "dust" will get onto the parchment paper, and not all over your counter/ the floor.
Then, when you are done making your four batches of cookies, cleaning up only takes seconds! Measuring out all of your ingredient in one area of the kitchen, rather than all over the place, quarantines the mess.
 Look at that cookie making gross-ness! But in 2.5 seconds or less, it's gone! 

Tip #2: Parchment Paper is your Friend!

So, I know I already told you one way how I use parchment paper in the baking process, but really, it works wonders. Say you need to crack some eggs, but don't want to get Salmonella all over your counter.... crack on Parchment! Need to cube some butter for that cookie recipe? No problem! Parchment allows for a customized butter cutting location!
Parchment also allows for easy transport of said butter to the cookie making bowl! It really is a wonderful multi-tasker.

Tip #3: Plan Ahead

Having a time line in mind about what kind of holiday baked goods and the quantity of each you want to make will really stream-line the process. And by planning ahead, it allows you to make all of the cookie dough one day, and you have time to bake on another day. I usually find the preparation of the cookie dough to be the "messiest" part, and the baking of everything to be the more "time consuming" part. But by dividing these processes into two days, you don't get worn out and there's less to clean up! A win-win situation in my book!

But you MUST plan ahead! No plan = stress! And no one needs more stress during the holiday times.... and cookies really aren't stressful, they are just festive!

Stay Tuned for Tomorrow!! Four Delicious & Easy Cookie Recipes!

December 21, 2011

Wonderful Pumpkin Breakfast

During this year's holiday season, I have become slightly obsessed with pumpkin. Like, pumpkin everything! Pumpkin for breakfast, lunch, dinner, and dessert! But one of my favorite pumpkin recipes is Pumpkin Oatmeal! This recipe make A LOT of oatmeal and is perfect addition to a Christmas Brunch! Or if you are just making the oatmeal for a few people, it keeps in the refrigerator really well.


Pumpkin Oatmeal

  • 2 cups milk or unsweetened almond/ soy milk
  • 2 cups water
  • 1 - 15 oz can pure pumpkin
  • 2 teaspoons cinnamon
  • 2 tablespoons raisins 
  • 2 cups old fashioned oats (NOT instant oats)
  • Chocolate chips, brown sugar, and nuts for serving
Yields ~6 servings

Step 1: Combine milk and water in a medium saucepan on the stove over medium heat. 
Step 2: Stir in pumpkin, cinnamon, and raisins and allow mixture to come to a slow boil. Once at a boil, add the oats and turn down the heat to medium low. They should look like this:
Step 3: Allow the oats to simmer for about 10 - 15 minutes or until the oats are tender and thick. 

Step 4: Ladle into bowls and serve oatmeal with chocolate chips, brown sugar, and walnuts on the side! 
The oatmeal when it comes off the stove is not sweet at all! So, I recommend adding some brown sugar and chocolate chips to give it a sweeter flavor. Or if you're looking for something with a little less added sugar, I often add a packet of Truvia to my oatmeal. It makes it sweet, but without adding gobs of pure sugar calories!

Speaking about calories, that reminds me that this recipe is SUPER healthy! Not only are you getting lots of soluble fiber from the oats (which helps lower your cholesterol), you are also getting A TON of Vitamin A from the pumpkin! Pumpkin is really wonderful and PACKED with nutrition. Just a 1/2 cup of pure pumpkin gives you 280% of your daily Vitamin A!! Vitamin A is important for good vision, bone development, and immune system function. So not only is pumpkin delicious, it is GREAT for your body!
Bet you never thought healthy food would look this good! Happy Healthy Eating!

Happy Hanukkah to my Jewish Friends!

December 19, 2011

A Christmas Zebra


Since it is only one week until Christmas, I thought it necessary for my first recipe post be very festive. Enter: Christmas Zebra Cake!!

Now, those of you who are new to baking, not to worry because although this cake looks amazing, it is really simple to make! For this cake I used a simple white cake recipe, because white cake is easily dyed and the colors will be vibrant. 

So, first thing first, prepare your cake batter. I used a recipe I found online from King Arthur Flour, but you can use whatever recipe you want to. Even boxed cake mix if you're in a rush.

If you want to use I recipe I did click here! Now go gather your ingredients.

Now you have them? Great! Mix all of the dry ingredients together (including the sugar) on low speed with a mixer until it looks light and fluffy like this:

Now make sure your butter is softened, and mix it into the dry ingredients until it looks a little mealy, like so:
Next add your egg whites and eggs one at a time, until they are fully incorporated into the batter. It will be pretty thick. 

Mix, mix, mix as well as you can. Then add the milk + vanilla into the batter into 3 installments. Be sure to NOT over-mix! Over-mixing will make a tough cake, and not a light fluffy one... and no one wants that!
Now that you have a finished batter, divide the batter into two bowls. Dye the separated batter green and red. Add as much food coloring until you reach your desired color. (For a deep red color, you will need a LOT of red food coloring. So now, it should look like this:

Now is the fun layering part. Get two 1/4 cup measures. And make sure you have two - 8'' round prepared cake pans. (FYI: "Prepared" cake pans = buttered + floured) Take a 1/4 cup of green batter and add it to the center of one of the cake pans.
Next you take a 1/4 cup of the red batter and pour it in the pan directly on top of the green batter, like this:
Repeat this process multiple times. I usually repeat this until I get 12 - 14 layers in one pan.
Repeat the process in both pans until it looks like a Christmas bulls-eye. 

Bake your pans in a 350 degree oven for about 25 minutes. Check them with a toothpick to make sure they are done! They will look like this:
The last thing you have to do is wait for them to cool, and frost with icing! 

Note: Make sure the cakes have COMPLETELY COOLED before you ice with frosting. There have been too many times that I have become impatient and frosted my cakes before they have fully cooled... BAD IDEA.
Ice and slice!
Another Note: Check the expiration dates of your chemical leaveners!! You may think this cake looks a little flat... well it is. After the cakes had baked, I noticed they hadn't really risen at all. And that was a problem considering I put in one tablespoon of baking powder in the mix. Old baking powder = no rise = less fluffy. The cake was good, but it would have been better if I had noticed the expiration date. DO NOT LET THIS PROBLEM HAPPEN TO YOU!

Happy Christmas!