December 24, 2011

Christmas Cookies: Part 2

Happy Christmas Eve!

I told you all I would NOT forget to tell you about those delicious double chocolate cookies I pictured yesterday!
And they are one BIG cookie! I adapted a double chocolate chip cookie recipe I found online, because I wanted the cookie to have more of a wintery holiday feel. With the addition of my "secret" ingredient, they came out really well with just a hit of peppermint!

What was my "secret" ingredient you ask? Candy Cane Joe Joe's!!
Now, Trader Joe's is one of my favorite grocery stores to visit, mainly because I always end up finding a product that looks delicious and is never on my actual grocery list. And that is how the candy cane Joe Joe's ended up in these cookies! Hope you enjoy!

Print this recipe!

Double Chocolate Chip Peppermint Cookies


Adapted from Annie's Eats


Ingredients

  • 1 cup (2 sticks) cold, unsalted butter
  • 1 1/4 cups sugar
  • 2 large eggs
  • 1/2 cup dark cocoa powder, sifted
  • 2 1/4 cups All Purpose Flour
  • 1/4 teaspoon salt
  • 1 teaspoon baking powder
  • 1/4 cup semi-sweet or dark chocolate chips
  • 12 Candy Cane Joe Joe's, crushed
Directions
  1. Preheat oven to 350 degrees.
  2. In a stand or electric mixer, combine the butter and sugar, and beat together until light and fluffy.
  3. Add in the eggs to the butter mixture one at a time, making sure each one is fully incorporated before adding the next.
  4. Add the cocoa powder into the mixture until throughly mixed together.
  5. Sift the rest of the dry ingredients together and add dry to the wet ingredients. Mix until just combined.
  6. With a spatula, stir in the chocolate chips and peppermint cookies until evenly combined.
  7. Roll the dough into rounded tablespoons and place on a parchment lined baking sheet. Flatten the tops of the dough balls slightly so they are flat on top. Visual:
Bake cookies for 12 - 15 minutes, being sure not to over-bake. Cool on a wire cooling rack and enjoy!

Yield: About 28 cookies

December 23, 2011

Christmas Cookies: Part 1

What a day! Not only have I baked off over 125 cookies today, I finished my Christmas shopping, and gathered all the groceries for our Christmas Eve Meal! Getting up early to beat the crowds to the mall and the grocery store was definitely the way to go!

But anyway, on to more important things.... cookies!!!!!

Don't they look yummy! These cookies have been my all time favorite sugar cookie recipe EVER! The recipe comes from a family friend, Maggie! Maggie and her husband, Bob, used to live right across the street from us when I was little, and she frequently took care of me. I remember helping her make these cookies as a little girl, and to this day I make a point to make a batch every December. They are SO fun to make and so vibrant with the colored sprinkles on top!

I just also recently learned that the sugar cookie recipe has been around for many years in Maggie's family. It actually came from Maggie's mother's Hungarian next door neighbor! Needless to say, I am very grateful the next door neighbor shared her recipe, because the cookies are absolutely delicious!


Print this recipe!

Maggie's Sugar Cookie Recipe


Ingredients

  • 1 cup powdered sugar
  • 1 cup granulated sugar
  • 1 cup butter/ margarine, softened
  • 1 cup canola oil
  • 2 large eggs
  • 1 teaspoon vanilla extract
  • 1 teaspoon salt
  • 1 teaspoon baking soda
  • 1 teaspoon cream of tarter
  • 4 1/4 cups all purpose flour
  • Colored sugar 
Directions
  1. Cream the butter and sugars together in a stand mixer on medium speed until light, fluffy, and smooth.
  2. Add the oil, eggs, and vanilla and mix until smooth.
  3. In a separate bowl, sift all of the dry ingredients together.
  4. Add the dry ingredients to the butter-sugar mixture and mix by hand with a wooden spoon.
  5. If the dough is too wet, refrigerate dough until it is a little stiffer and will roll easily into balls.
  6. Take about 1 tablespoon worth of the dough and roll into a ball. Place on an un-greased cookie sheet about 1 inch apart.
  7. Press colored sugar into dough (explanation below).
  8. Bake cookies at 375 degrees for 6 - 8 minutes. Cookies will have barely any brown color.
Yield: 4 dozen cookies

Now the fun part... adding the sprinkles!

For this, you will need a flat bottomed glass and a bowl for your colored sugar. I usually have a set up that looks like this:


I like to use a separate glass for every sprinkle color. So, by now you should have rolled out your little dough balls and placed them on the cookie sheet. Pour your colored sugar out into two small bowls wide enough so that your glasses can rest in them. 

Before you use your glasses, press the bottom of the glasses into the prepared cookie dough, so they are a little sticky/ tacky on the bottom. That way, when you put your glass in the sugar bowl, the sprinkles will stick to it!

With your sugar stuck to the bottom of the glass, next flatten your little round dough balls into flat disks. The sugar will now be sticking to the top of the cookie! For visual learning:


Repeat the process until all your cookies are pressed out. Then you are ready to bake! They are super fast and only take about 7 minutes in the oven!
Delicious! And don't worry, I'll tell you all what those yummy chocolate cookies are too!

Happy Holidays!

December 22, 2011

Baking Tips - Cleaning Edition

If you are like me, then holiday time means one thing: Baking TONS of Christmas Cookies! But with baking tons of cookies usually comes... TONS OF CLEANING!! And I really dislike cleaning the whole kitchen after spending all of my energy baking. So I have devised a few quick and easy ways to minimize cleaning, while maximizing your cookie output production.

Tip #1: Set aside an ingredient area

I like to pick a spot in my kitchen (preferably near the sink) where I can measure out all of my ingredients. Then I put a very large piece of parchment paper down onto the surface (as seen below). In this area I like to put all of my dry ingredients that have the highest potential of getting stuck to every possible surface. Ex: flour, cocoa powder, sugar, powdered sugar, etc. That way, when you scoop out a few cups of flour for one recipe, and will need it again later, all of the flour "dust" will get onto the parchment paper, and not all over your counter/ the floor.
Then, when you are done making your four batches of cookies, cleaning up only takes seconds! Measuring out all of your ingredient in one area of the kitchen, rather than all over the place, quarantines the mess.
 Look at that cookie making gross-ness! But in 2.5 seconds or less, it's gone! 

Tip #2: Parchment Paper is your Friend!

So, I know I already told you one way how I use parchment paper in the baking process, but really, it works wonders. Say you need to crack some eggs, but don't want to get Salmonella all over your counter.... crack on Parchment! Need to cube some butter for that cookie recipe? No problem! Parchment allows for a customized butter cutting location!
Parchment also allows for easy transport of said butter to the cookie making bowl! It really is a wonderful multi-tasker.

Tip #3: Plan Ahead

Having a time line in mind about what kind of holiday baked goods and the quantity of each you want to make will really stream-line the process. And by planning ahead, it allows you to make all of the cookie dough one day, and you have time to bake on another day. I usually find the preparation of the cookie dough to be the "messiest" part, and the baking of everything to be the more "time consuming" part. But by dividing these processes into two days, you don't get worn out and there's less to clean up! A win-win situation in my book!

But you MUST plan ahead! No plan = stress! And no one needs more stress during the holiday times.... and cookies really aren't stressful, they are just festive!

Stay Tuned for Tomorrow!! Four Delicious & Easy Cookie Recipes!

December 21, 2011

Wonderful Pumpkin Breakfast

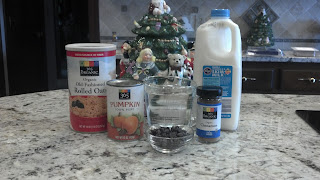
During this year's holiday season, I have become slightly obsessed with pumpkin. Like, pumpkin everything! Pumpkin for breakfast, lunch, dinner, and dessert! But one of my favorite pumpkin recipes is Pumpkin Oatmeal! This recipe make A LOT of oatmeal and is perfect addition to a Christmas Brunch! Or if you are just making the oatmeal for a few people, it keeps in the refrigerator really well.


Pumpkin Oatmeal

  • 2 cups milk or unsweetened almond/ soy milk
  • 2 cups water
  • 1 - 15 oz can pure pumpkin
  • 2 teaspoons cinnamon
  • 2 tablespoons raisins 
  • 2 cups old fashioned oats (NOT instant oats)
  • Chocolate chips, brown sugar, and nuts for serving
Yields ~6 servings

Step 1: Combine milk and water in a medium saucepan on the stove over medium heat. 
Step 2: Stir in pumpkin, cinnamon, and raisins and allow mixture to come to a slow boil. Once at a boil, add the oats and turn down the heat to medium low. They should look like this:
Step 3: Allow the oats to simmer for about 10 - 15 minutes or until the oats are tender and thick. 

Step 4: Ladle into bowls and serve oatmeal with chocolate chips, brown sugar, and walnuts on the side! 
The oatmeal when it comes off the stove is not sweet at all! So, I recommend adding some brown sugar and chocolate chips to give it a sweeter flavor. Or if you're looking for something with a little less added sugar, I often add a packet of Truvia to my oatmeal. It makes it sweet, but without adding gobs of pure sugar calories!

Speaking about calories, that reminds me that this recipe is SUPER healthy! Not only are you getting lots of soluble fiber from the oats (which helps lower your cholesterol), you are also getting A TON of Vitamin A from the pumpkin! Pumpkin is really wonderful and PACKED with nutrition. Just a 1/2 cup of pure pumpkin gives you 280% of your daily Vitamin A!! Vitamin A is important for good vision, bone development, and immune system function. So not only is pumpkin delicious, it is GREAT for your body!
Bet you never thought healthy food would look this good! Happy Healthy Eating!

Happy Hanukkah to my Jewish Friends!

December 19, 2011

A Christmas Zebra


Since it is only one week until Christmas, I thought it necessary for my first recipe post be very festive. Enter: Christmas Zebra Cake!!

Now, those of you who are new to baking, not to worry because although this cake looks amazing, it is really simple to make! For this cake I used a simple white cake recipe, because white cake is easily dyed and the colors will be vibrant. 

So, first thing first, prepare your cake batter. I used a recipe I found online from King Arthur Flour, but you can use whatever recipe you want to. Even boxed cake mix if you're in a rush.

If you want to use I recipe I did click here! Now go gather your ingredients.

Now you have them? Great! Mix all of the dry ingredients together (including the sugar) on low speed with a mixer until it looks light and fluffy like this:

Now make sure your butter is softened, and mix it into the dry ingredients until it looks a little mealy, like so:
Next add your egg whites and eggs one at a time, until they are fully incorporated into the batter. It will be pretty thick. 

Mix, mix, mix as well as you can. Then add the milk + vanilla into the batter into 3 installments. Be sure to NOT over-mix! Over-mixing will make a tough cake, and not a light fluffy one... and no one wants that!
Now that you have a finished batter, divide the batter into two bowls. Dye the separated batter green and red. Add as much food coloring until you reach your desired color. (For a deep red color, you will need a LOT of red food coloring. So now, it should look like this:

Now is the fun layering part. Get two 1/4 cup measures. And make sure you have two - 8'' round prepared cake pans. (FYI: "Prepared" cake pans = buttered + floured) Take a 1/4 cup of green batter and add it to the center of one of the cake pans.
Next you take a 1/4 cup of the red batter and pour it in the pan directly on top of the green batter, like this:
Repeat this process multiple times. I usually repeat this until I get 12 - 14 layers in one pan.
Repeat the process in both pans until it looks like a Christmas bulls-eye. 

Bake your pans in a 350 degree oven for about 25 minutes. Check them with a toothpick to make sure they are done! They will look like this:
The last thing you have to do is wait for them to cool, and frost with icing! 

Note: Make sure the cakes have COMPLETELY COOLED before you ice with frosting. There have been too many times that I have become impatient and frosted my cakes before they have fully cooled... BAD IDEA.
Ice and slice!
Another Note: Check the expiration dates of your chemical leaveners!! You may think this cake looks a little flat... well it is. After the cakes had baked, I noticed they hadn't really risen at all. And that was a problem considering I put in one tablespoon of baking powder in the mix. Old baking powder = no rise = less fluffy. The cake was good, but it would have been better if I had noticed the expiration date. DO NOT LET THIS PROBLEM HAPPEN TO YOU!

Happy Christmas!

December 18, 2011

I Started A Blog!!

Hello and Welcome to my Blog!

I have decided to start a blog, and to me this is semi-unusual. Mainly because I NEVER would have ever thought I would start a blog. This is for a number of reasons:

1. I used to really dislike blogs. I had looked at a few blogs, but none of them had ever really interested me and I decided that blogs were not my thing. But really, I had just never found the right kind of blog. Then I discovered my FAVORITE blog, EatLiveRun, and I got semi-addicted.

2. I'm not a writer. In school, english and humanities courses weren't really my thing. I was always a math and science person. I liked chemistry, but not as a college major (learned that the hard way).

3. Sometimes I'm not very good at finishing projects I start. There have been many a time where I have started some project like sewing a dress or making a quilt, and I get part of the way through it, but then something comes up and it gets shoved in my closet. But I will NOT let that happen to this blog! When it comes to something food related (such as this blog) I usually finish my fun foodie projects.

So, like most blogs, this one has a theme, and as I mentioned this is a very food themed blog. And naming the blog was probably the hardest part of starting. It took me a really long time to figure out a perfect and unique name and I'm very happy with what I've come up with. So the official blog name is:

Eats, Sweets, & Treats!

I really like this name and I think it encompasses all of what I want to talk about and emphasize.

1. Eats - I love food and have always enjoyed cooking since I was young. My first and biggest cooking endeavor was when I was 10 years old and I made a multi-course diner for 8 people, complete with printed menus and name cards. The "eats" part would mainly be like savory and lunch/ dinner type food.

2. Sweets - Baking is one of my favorite things to do! I think it is also appropriate that I am starting this blog around the holidays, because there will be plenty of yummy desserts I can blog about!

3. Treats - I also love holidays and the "treats" section will try to highlight this. I have also become obsessed with Pinterest and there are SO many good ideas for the holidays! No doubt I will feature some of those while blogging as well.

So, I guess that sums up the main theme of the blog! But for those who are health conscious, not to worry because I love making my food as healthy as possible! I have even turned my love of food into a profession! I am currently working towards my Masters in Nutrition and to become a Registered Dietitian. So not only will my food be yummy, it will also be relatively healthy (most of the time!).

I know is first post is kind of boring, with no pictures and everything, but I will add more variety in my next post!